Setting up Image Previews using Puppeteer, Make, and CSS transforms
Before anything else—I'm making this static site the hard way. I should be using a static-site generator like hugo or jekyll. They likely have easy support for something like this. Doing this from scratch means that as I write this, my site's RSS feed is broken on some readers and lacks the content it should on others, dark mode is turned off because syntax highlighting doesn't look right, footnotes are broken, and the site just doesn't look the way I want it to. Despite all that, I'm glad I'm making this site the wrong way: it's been fun to play with!
(Funnily enough, because this site is a janky collection of bash scripts and JS, this exact post was broken in a way where 80% of it was missing for over a year because I messed something up when changing how I parsed post settings...)
One of the features that I wanted to add to this site was image-previews; I wanted a nice preview image to show up when I share a post on slack or twitter. Given that this blog is primarily about programming, I wanted to set up a picture of code from the post... and I didn't want to have to spend seconds manually taking a screenshot of my editor like some sort of savage. I wanted to instead spend hours automating it!
And isn't this a little vain? Yes! Yes, it is. I want my site to feel pretty, and now it does!
Rendering a nice preview image
A picture of code isn't that visually interesting, so I wanted to jazz it up by putting the code into something that looks vaguely like an editor and then adding a bit of perspective.
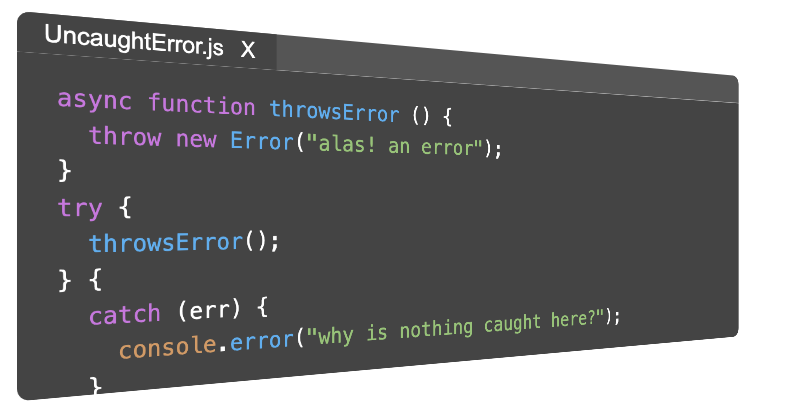
I started by creating a file in an editor like this:
- title: UncaughtError.js
- codePreview: true

<pre>
async function throwsError () {
  throw new Error("alas! an error");
  try {
    throwsError();
  } catch (err) {
    console.error("why is nothing caught here?");
  }
}
</pre>
I then updated the code I use to render a markdown page into HTML to look for the codePreview tag and render it into a page with custom CSS and with the title and content both wrapped with containing divs. This took care of syntax highlighting and was a good starting point for the rest of the work.
I'm not that comfortable with CSS, but I was still able to muddle my way through setting up appropriately colored boxes for the different pieces of a fake text editor. The tricky bit was adding perspective to it, but thankfully the MDN docs on transform and transform-style were easy to figure out. After playing around with different perspectives, I ended up with:
.editor {
  position: absolute;
  top: 50px;
  left: 50px;
  min-width: 800px;

  transform-style: preserve-3d;
  transform: perspective(1000px) rotateY(30deg);
}
Taking a screenshot
Thanks to Puppeteer, taking a screenshot of a static page proved simple:
const puppeteer = require("puppeteer");

(async () => {
  const browser = await puppeteer.launch({
    args: [
      "--no-sandbox",
      "--disable-setuid-sandbox",
      "--disable-dev-shm-usage",
      "--single-process",
      "--ignore-certificate-errors",
      "--dark-mode-screenshot",
    ],
    ignoreHTTPSErrors: true,
    headless: true,
  });
  const page = await browser.newPage();
  await page.goto("http://localhost:8080/code-preview/index.html");
  await page.setViewport({
    width: 800,
    height: 418,
  });
  await page.screenshot({
    path: process.argv[2],
    omitBackground: true,
    darkMode: true,
    // deviceScaleFactor: 2, (if you're on a retina device)
  });

  process.exit(0);
})();
With that, I was able to run a command like node ./scripts/screenshot.js where_to_store_the_screenshot.png to create an image for a single post.
Using Make to run commands and minimize work
At this point, I had a good way to render a single image by running a command, but I wanted to set things up so that I could quickly create all of the screenshots for all of my posts and skip work when they were already up to date.
Makefiles support "recipes" where you specify how to make any of a particular type of file. To set up a recipe to create my screenshots, I wrote:
images/previews/%.png: ./code-preview/previews/%.md
	./code-preview/make-code-preview.sh $< $@
This says:
- any file that matches the pattern
/images/previews/%.pngshould be updated when the corresponding file./code-preview/previews/%.mdchanges. - when it runs, it should run the
./code-preview/make-code-preview.shscript with the first prerequisite$<(./code-preview/preview/FileName.md) as the first argument and the target$@(./images/previews/FileName.png) as the second argument.
More concretely, if I make a a markdown file at ./code-preview/previews/MyPreview.md and then run make images/previews/MyPreview.png, make will run ./code-preview/make-code-preview.sh ./code-preview/previews/MyPreview.md images/previews/MyPreview.png. 1
The ./make-code-preview.sh script is simple and only depends on having a server running and hosting the .built directory:
./scripts/runTemplating.js "$1" > "./built/screenshot.html"
node ./scripts/screenshot.js "$2"
This is nice, but it still depends on me manually running commands like make ./images/previews/ImageIWant.png, so I set up another make recipe and script to handle that:
for file in $(find ./code-preview/previews -type f); do
  outputFile="images/previews/$(basename $file .md).png"
  make $outputFile
done
This will attempt to run the make images/previews/ImageIWant.png command for all of the files in the ./code-preview/previews directory. Make will only actually do the work to generate a png if the associated md file has been updated since the last time it generated the png.
(Don't write for loops like this btw! I'm being lazy because I know I won't add spaces to any of my filenames.)
Could this have been simpler? Absolutely! There are probably any number of much cleaner ways to accomplish the same thing, but this works well enough to let me quickly generate all of the images I need.
Using twitter:image meta tags
At this point, it's simple to add these images to posts. Because of how popular twitter is, most platforms seem to look for twitter meta card tags:
<meta name="twitter:title" content="${title}" />
<meta name="twitter:description" content="${summary}" />
${image ? `<meta name="twitter:image" content="https://will-keleher.com${image}" />` : ""}
${image ? `<meta name="twitter:card" content="summary_large_image" />` : `<meta name="twitter:card" content="summary" />`}
Twitter preview tools (like this one) can help you check whether you've created valid twitter card tags.
And after all that work, sharing links for posts can look slightly fancier!